
こんにちは。ライターの亀田です。
実用的なWebアプリを作る際には、認証機能は欠かせません。
ユーザーがログインIDおよびパスワードを入力し、機能を利用するという流れは、どのようなWebサービスを利用しても必ず見受けられます。
そのため、CakePHPでも、認証機能を生成するための仕組みが用意されています。
とは言え、この部分はCakePHPの初心者にとってはかなり難しい部分です。
そこでここでは、簡単なサンプルコードを交えながら丁寧に説明していくことにします。
CakePHPで認証処理を行うには、Authコンポーネントを必要とします。そこで最初に
・Authコンポーネントの認証と認可
・Authコンポーネントの使い方
でAuthコンポーネントの基本について説明します。
次に、
・認可について
・設定オプションについて
で、さらに詳細な設定をする方法について、解説していきます。
CakePHPでの認証機能の実装は、初心者にとっては一筋縄ではいかない部分です。しかし、Web制作のスキルを身につけることは、将来のキャリアや収入を大きく左右する重要な要素です。「自分の力だけでは難しいかも…」と感じた方に、別の環境やサポートを活用することをおすすめします。
実践的なスキルを身につけるための環境を利用すれば、すぐに使える具体的なノウハウを学ぶことができます。生成AIとWeb制作の知識を組み合わせることで、収益化のチャンスを広げることが可能です。
少しでも興味がある方は、まずは一度セミナーの詳細を確認して、自分に合った方法を探してみませんか?
Authコンポーネントの認証と認可
CakePHPには、Authコンポーネントという、認証処理に必要なコンポーネントが用意されています。
これを利用すれば、簡単に認証を必要とするアプリケーションを作ることが出来ます。
ここでは、実際のコードのサンプルをもとにしながら、その仕組みと使い方を説明します。
まずは、composerを利用してプロジェクトを作ってください。
次に管理するユーザーテーブルを作りましょう。MySQLで以下の処理を行ってusersテーブルを作りましょう。
CREATE TABLE users (
    id INT UNSIGNED AUTO_INCREMENT PRIMARY KEY,
    username VARCHAR(50),
    password VARCHAR(255),
    role VARCHAR(20),
    created DATETIME DEFAULT NULL,
    modified DATETIME DEFAULT NULL
);
これが出来たら、config/app.phpを変更して、データベースの設定を行ってください。設定する箇所は、以下の通りです。
    'Datasources' => [
        'default' => [
            …(中略)…
            //'port' => 'non_standard_port_number',
            'username' => 'root',
            'password' => '',
            'database' => 'test',
            'encoding' => 'utf8',
            'timezone' => 'UTC',
            'flags' => [],
            'cacheMetadata' => true,
            'log' => true,
usernameおよびpasswordは、MySQLにアクセスするためのユーザー名およびパスワードです。
databaseはアクセスするデータベース名です。
以上を、自分が開発する環境に合わせて書き換えてください。
また、CakePHPでのデータベースの設定については以下で詳しく説明しています。
こちらも参考にしてみてください。
このusersテーブルは、ユーザー名およびパスワードなどを含むテーブルです。これを元にして、bakeを用いて必要なソースコードを一気に生成してしまいましょう。
cake bake All Users
なお、以上の一連の流れは以下の記事で詳しく説明していますので、参考にしてみてください。

これで、Usersコントローラを用いて認証を行う仕組みの土台が出来上がります。
まずは、AppController.phpを、以下のように変更してみてください。
/src/Controller/AppController.php
<?php
/**
 * CakePHP(tm) : Rapid Development Framework (https://cakephp.org)
 * Copyright (c) Cake Software Foundation, Inc. (https://cakefoundation.org)
 *
 * Licensed under The MIT License
 * For full copyright and license information, please see the LICENSE.txt
 * Redistributions of files must retain the above copyright notice.
 *
 * @copyright Copyright (c) Cake Software Foundation, Inc. (https://cakefoundation.org)
 * @link      https://cakephp.org CakePHP(tm) Project
 * @since     0.2.9
 * @license   https://opensource.org/licenses/mit-license.php MIT License
 */
namespace App\Controller;

use Cake\Controller\Controller;
use Cake\Event\Event;

/**
 * Application Controller
 *
 * Add your application-wide methods in the class below, your controllers
 * will inherit them.
 *
 * @link https://book.cakephp.org/3.0/en/controllers.html#the-app-controller
 */
class AppController extends Controller
{

    /**
     * Initialization hook method.
     *
     * Use this method to add common initialization code like loading components.
     *
     * e.g. `$this->loadComponent('Security');`
     *
     * @return void
     */
    public function initialize()
    {
        parent::initialize();

        $this->loadComponent('RequestHandler', [
            'enableBeforeRedirect' => false,
        ]);
        $this->loadComponent('Flash');

        $this->loadComponent('Auth', [
            'loginRedirect' => [
                'controller' => 'Users',
                'action' => 'index'
            ],
            'logoutRedirect' => [
                'controller' => 'Users',
                'action' => 'login'
            ],
            'authenticate' => [
                'Form' => [
                  'userModel' => 'Users',
                  'fields' => [
                    'username' => 'username',
                    'password' => 'password'
                  ]
                ]
            ],
        ]);

        $this->Auth->allow(['login','add']);


        /*
         * Enable the following component for recommended CakePHP security settings.
         * see https://book.cakephp.org/3.0/en/controllers/components/security.html
         */
        //$this->loadComponent('Security');
    }
}
Authコンポーネントの使い方
すでに説明したとおり、認証を行うのが、Authコンポーネントです。
AppController.phpのinitializeメソッドでその設定および処理が行われています。
ここでは、ログイン・ログアウト時のページ遷移を定義しています。
loginRedirectで指定されているものは、ログイン後にリダイレクトを行うページを表しています。
ここでは、indexを指定していますから、ログイン後にUsersのindexにリダイレクトが行われるわけです。
logoutRedirectについても同様です。
実際に運用するときにはcontrollerおよび、actionの部分を必要に応じて書き換えてください。
認証ハンドラーの設定について
次に、認証をした際に利用できるページと、そうでないページの区別をつけます。ここでは、以下のように設定されています。
$this->Auth->allow(['login','add']);
このメソッドで行う処理は、この場合は認証処理の例外になるページを指定しています。
つまり、loginと、addに関しては、ログインをしなくても呼び出せるということを意味しています。
当たり前のことですが、ログイン画面が使えなければ、ログイン処理が出来ませんからここは除外します。
同様に、新規ユーザーを追加する画面をaddとして、これを除外することにします。
ユーザーの識別とログインについて
ここから具体的に認証ハンドラーについて説明していきます。認証ハンドラーは、authenticateという名前で、ここでは以下のように設定しています。
            'authenticate' => [
                'Form' => [
                  'userModel' => 'Users',
                  'fields' => [
                    'username' => 'username',
                    'password' => 'password'
                  ]
                ]
            ]
Formの部分はBasicおよび、Digestと指定できます。デフォルトではFormです。
ここを変更すればBasic認証、ダイジェスト認証の区別を指定可能です。
この2つの認証方法には、それぞれ一長一短があります。詳しく知りたい方は、こちらを参考にして見てください。
Basic認証(基本認証)とDigest認証、それぞれの役割と違いについて
https://madalinazaharia.com/column/basic-authentication-and-digest-authentication/
fieldsで、カラムの属性を指定します。ユーザー名をusername、パスワードをpasswordというカラムで設定することを意味しています。
キーの部分が属性、値の部分がデータベースのカラム名を指します。この場合、両方が一致してます。
ここの値を変えるときは、キーの部分を変えてください。
なお、この部分は、bakeを使用してプロジェクトを作成すると省略できますが、ここでは判りやすくするためにあえて記述しました。
認証システムの作成について
次に、認証システムを具体的に実装していきます。
まずはUserController.phpを実装します。ここは、以下のようにしてください。
/src/Controller/UserController.php
<?php
namespace App\Controller;

use App\Controller\AppController;

/**
 * Users Controller
 *
 * @property \App\Model\Table\UsersTable $Users
 *
 * @method \App\Model\Entity\User[]|\Cake\Datasource\ResultSetInterface paginate($object = null, array $settings = [])
 */
class UsersController extends AppController
{
    /**
     * Index method
     *
     * @return \Cake\Http\Response|void
     */
    public function index()
    {
        $users = $this->paginate($this->Users);

        $this->set(compact('users'));
    }

    /**
     * View method
     *
     * @param string|null $id User id.
     * @return \Cake\Http\Response|void
     * @throws \Cake\Datasource\Exception\RecordNotFoundException When record not found.
     */
    public function view($id = null)
    {
        $user = $this->Users->get($id, [
            'contain' => []
        ]);

        $this->set('user', $user);
    }

    /**
     * Add method
     *
     * @return \Cake\Http\Response|null Redirects on successful add, renders view otherwise.
     */
    public function add()
    {
        $user = $this->Users->newEntity();
        if ($this->request->is('post')) {
            $user = $this->Users->patchEntity($user, $this->request->getData());
            if ($this->Users->save($user)) {
                $this->Flash->success(__('The user has been saved.'));

                return $this->redirect(['action' => 'index']);
            }
            $this->Flash->error(__('The user could not be saved. Please, try again.'));
        }
        $this->set(compact('user'));
    }

    /**
     * Edit method
     *
     * @param string|null $id User id.
     * @return \Cake\Http\Response|null Redirects on successful edit, renders view otherwise.
     * @throws \Cake\Datasource\Exception\RecordNotFoundException When record not found.
     */
    public function edit($id = null)
    {
        $user = $this->Users->get($id, [
            'contain' => []
        ]);
        if ($this->request->is(['patch', 'post', 'put'])) {
            $user = $this->Users->patchEntity($user, $this->request->getData());
            if ($this->Users->save($user)) {
                $this->Flash->success(__('The user has been saved.'));

                return $this->redirect(['action' => 'index']);
            }
            $this->Flash->error(__('The user could not be saved. Please, try again.'));
        }
        $this->set(compact('user'));
    }

    /**
     * Delete method
     *
     * @param string|null $id User id.
     * @return \Cake\Http\Response|null Redirects to index.
     * @throws \Cake\Datasource\Exception\RecordNotFoundException When record not found.
     */
    public function delete($id = null)
    {
        $this->request->allowMethod(['post', 'delete']);
        $user = $this->Users->get($id);
        if ($this->Users->delete($user)) {
            $this->Flash->success(__('The user has been deleted.'));
        } else {
            $this->Flash->error(__('The user could not be deleted. Please, try again.'));
        }

        return $this->redirect(['action' => 'index']);
    }

    #以下のメソッドを追加

    public function login()
    {
        if ($this->request->is('post')) {
            $user = $this->Auth->identify();
            if ($user) {
                $this->Auth->setUser($user);
                return $this->redirect($this->Auth->redirectUrl());
            }
            $this->Flash->error(__('Invalid username or password, try again'));
        }
    }
    public function logout()
    {
        return $this->redirect($this->Auth->logout());
    }
}
ここには、index,view,add,loginの各ページの処理が行われています。
loginページでは、認証画面で行われた認証処理が成功すれば、indexページへ、そうでなければエラーメッセージが表示されるようになっています。
addページでは、ユーザーの追加を行えるようになっています。
このあたりは、ほぼ決まり文句のようになっていますので、そのまま流用が可能です。
パスワードのハッシュ化について
ところで、通常、このようなシステムを作る場合、データベース上のパスワードはハッシュ化を施して隠蔽するのが常識です。
ハッシュ化というのは、パスワードのような大事なキーワードを、特殊な方法で判読できなくする方法です。
これによりハッキングによる不正アクセスを防ぎます。
その設定は、テーブルに関する処理に記述必要があります。
テーブルに関する情報は、以下のソースに記述されています。まずは、Entityを見てみましょう。
src/Model/Entity/User.php
<?php
namespace App\Model\Entity;

use Cake\ORM\Entity;
use Cake\Auth\DefaultPasswordHasher;

class User extends Entity
{
    protected $_accessible = [
        '*' => true,
        'id' => false
    ];
    protected $_hidden = [
        'password'
    ];

    protected function _setPassword($password)
    {
        if (strlen($password) > 0) {
            return (new DefaultPasswordHasher)->hash($password);
        }
    }
}
なお、ファイル名は、UsersではなくUserであることに注意してください。
ここで注目して欲しいのが、_setPasswordメソッドです。これはパスワードのセットを行うときに呼び出されるメソッドなのですが、DefaultPasswordHasherクラスを利用することにより、ハッシュ化しています。
このように、Entityで_set○○というprotectedメソッドを呼ぶことで、○○というカラムをデータベースに保存する直前に、値を編集をすることが出来るのです。
パラメーターには、カラム名の前に「_」記号を付けます。ここに保存しようとしていたデータが入ってきます。
ですから、この場合は、passwordなので、_passwordとなるわけです。
ちなみに、ハッシュで使うsaltはapp.phpに記載されています。
'Security' => [
        'salt' => env('SECURITY_SALT', 'a3af2c5df7e1781db8a3e3c4cdac1bfca595539f83662f3ade304c6148d5795f'),
],
saltの変更が必要な場合は、ここを変えてください。
次に、UsersTable.phpを紹介します。こちらは以下のように実装してください。
src/Model/Table/UserTable.php
<?php
namespace App\Model\Table;

use Cake\ORM\Query;
use Cake\ORM\RulesChecker;
use Cake\ORM\Table;
use Cake\Validation\Validator;

class UsersTable extends Table
{
    public function initialize(array $config)
    {
        parent::initialize($config);

        $this->setTable('users');
        $this->setDisplayField('id');
        $this->setPrimaryKey('id');

        $this->addBehavior('Timestamp');
    }
    public function validationDefault(Validator $validator)
    {
        return $validator
            ->notEmpty('username', 'A username is required')
            ->notEmpty('password', 'A password is required')
            ->notEmpty('role', 'A role is required')
            ->add('role', 'inList', [
                'rule' => ['inList', ['admin', 'author']],
                'message' => 'Please enter a valid role'
            ]);
    }
    public function buildRules(RulesChecker $rules)
    {
        $rules->add($rules->isUnique(['username']));

        return $rules;
    }
}
手動でのユーザーログインについて
では、最後に.ctpファイルを全て紹介します。
/src/Template/Users/login.ctp
<div class="users form large-9 medium-8 columns content">
    <?= $this->Flash->render() ?>
    <?= $this->Form->create() ?>
    <fieldset>
        <legend><?= __('Please enter your username and password') ?></legend>
        <?= $this->Form->control('username') ?>
        <?= $this->Form->control('password') ?>
    </fieldset>
    <?= $this->Form->button(__('Submit')) ?>
    <?= $this->Form->end() ?>
</div>
/src/Template/Users/add.ctp
<div class="users form large-9 medium-8 columns content">
    <?= $this->Form->create($user) ?>
    <fieldset>
        <legend><?= __('Add User') ?></legend>
        <?= $this->Form->control('username') ?>
        <?= $this->Form->control('password') ?>
        <?= $this->Form->control('role', [
            'options' => ['admin' => 'Admin', 'author' => 'Author']
        ]) ?>
   </fieldset>
    <?= $this->Html->link(__('Login'), ['action' => 'login']) ?>
    <?= $this->Form->button(__('Submit')) ?>
    <?= $this->Form->end() ?>
</div>
/src/Template/Users/index.ctp
<nav class="large-3 medium-4 columns" id="actions-sidebar">
    <ul class="side-nav">
        <li class="heading"><?= __('Actions') ?></li>
        <li><?= $this->Html->link(__('Logout'), ['action' => 'logout']) ?></li>
    </ul>
</nav>
<div class="users index large-9 medium-8 columns content">
    <h3><?= __('Users') ?></h3>
    <table cellpadding="0" cellspacing="0">
        <thead>
            <tr>
                <th scope="col"><?= $this->Paginator->sort('id') ?></th>
                <th scope="col"><?= $this->Paginator->sort('username') ?></th>
                <th scope="col"><?= $this->Paginator->sort('password') ?></th>
                <th scope="col"><?= $this->Paginator->sort('role') ?></th>
                <th scope="col"><?= $this->Paginator->sort('created') ?></th>
                <th scope="col"><?= $this->Paginator->sort('modified') ?></th>
                <th scope="col" class="actions"><?= __('Actions') ?></th>
            </tr>
        </thead>
        <tbody>
            <?php foreach ($users as $user): ?>
            <tr>
                <td><?= $this->Number->format($user->id) ?></td>
                <td><?= h($user->username) ?></td>
                <td><?= h($user->password) ?></td>
                <td><?= h($user->role) ?></td>
                <td><?= h($user->created) ?></td>
                <td><?= h($user->modified) ?></td>
                <td class="actions">
                    <?= $this->Html->link(__('View'), ['action' => 'view', $user->id]) ?>
                </td>
            </tr>
            <?php endforeach; ?>
        </tbody>
    </table>
    <div class="paginator">
        <ul class="pagination">
            <?= $this->Paginator->first('<< ' . __('first')) ?>
            <?= $this->Paginator->prev('< ' . __('previous')) ?>
            <?= $this->Paginator->numbers() ?>
            <?= $this->Paginator->next(__('next') . ' >') ?>
            <?= $this->Paginator->last(__('last') . ' >>') ?>
        </ul>
        <p><?= $this->Paginator->counter(['format' => __('Page {{page}} of {{pages}}, showing {{current}} record(s) out of {{count}} total')]) ?></p>
    </div>
</div>
/src/Template/Users/view.ctp
<nav class="large-3 medium-4 columns" id="actions-sidebar">
    <ul class="side-nav">
        <li class="heading"><?= __('Actions') ?></li>
        <li><?= $this->Html->link(__('List Users'), ['action' => 'index']) ?> </li>
        <li><?= $this->Html->link(__('Logout'), ['action' => 'logout']) ?></li>
    </ul>
</nav>
<div class="users view large-9 medium-8 columns content">
    <h3><?= h($user->id) ?></h3>
    <table class="vertical-table">
        <tr>
            <th scope="row"><?= __('Username') ?></th>
            <td><?= h($user->username) ?></td>
        </tr>
        <tr>
            <th scope="row"><?= __('Role') ?></th>
            <td><?= h($user->role) ?></td>
        </tr>
        <tr>
            <th scope="row"><?= __('Id') ?></th>
            <td><?= $this->Number->format($user->id) ?></td>
        </tr>
        <tr>
            <th scope="row"><?= __('Created') ?></th>
            <td><?= h($user->created) ?></td>
        </tr>
        <tr>
            <th scope="row"><?= __('Modified') ?></th>
            <td><?= h($user->modified) ?></td>
        </tr>
    </table>
</div>
以上で必要なソースコードは全て出揃いました。
一番最初に、addでユーザーを登録します。その後でloginに移動し、ユーザー名・パスワードを入れてログインすると、indexに飛びます。
XAMPPで行う場合、ユーザーの追加は
http://localhost/[プロジェクト名]/users/add
としてください。以下のように、ユーザー追加画面があらわれます。

ログインは
http://localhost/[プロジェクト名]/users/login
としてください。

なお、認証を行う前にindexおよび、viewを指定したとしても、loginに戻ってしまいます。
ログインすると、index画面に移行します。登録されているユーザー名の一覧が表示されます。
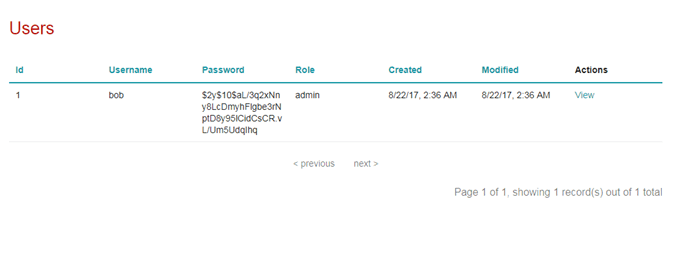
ユーザー名の最後にあるViewを押すと、そのユーザー情報の詳細が表示されます。
認可について
この例では、あくまでも単純なログイン・ログアウトができるサンプルで説明しました。
ただ、ユーザーに、adminおよび一般ユーザーなどの権限を区別をする必要がある場合もあります。
そのような場合は、認可ハンドラーを使うと大変便利です。
認可ハンドラーは authorizeコンポーネントを使用します。
これを利用すれば、権限により見られるページを制限したり、処理を振り分けたりすることも可能になります。
AppControllerの、initializeおよびbeforeFilterで設定が可能です。
興味がある方は、以下を参考にしてください。
CakePHPの認証・認可についての説明
https://book.cakephp.org/3.0/ja/controllers/components/authentication.html#id24
設定オプションについて
以上で、CakePHPの認証に関する説明は終了です。
最後に、CakePHPのAuthコンポーネントの設定オプションについて、簡単に紹介しておきます。
・ajaxLogin
期限切れのセッションなどを伴った処理のオプション
・allowedActions
ユーザーの妥当性チェックが必要ないコントローラーの指定
・authenticate
ユーザーのログインに使いたい認証オブジェクトの設定
・authError
アクセス権の無いアクセスをした場合に表示されるエラーの設定
・authorize
各リクエストでユーザーの認可に使いたい認可オブジェクトの設定
これらを上手に活用すれば、認証を伴う実用的なウェブアプリが作れます。
まとめ
この記事では、CakePHPで認証を行う方法について以下の手順で説明しました。
・Authコンポーネントの認証と認可
・Authコンポーネントの使い方
・認可について
・設定オプションについて
以上を参考にすればブログのようなCMSやSNSサイト、更には写真投稿サイトを作成可能です。
PHPのみでこれらを実装しようとすると大変な労力と時間を必要とします。
しかし、CakePHP を用いれば、誰でも簡単に実現できるのです。