
Pythonをインストールして、いよいよプログラムを書いて、実行してみよう!と思っても、どうやって実行するのかわからない!
ということになっていませんか?
この記事では、
- Python(またはAnaconda、またはPyCharm)をインストールしたんだけど実行方法がわからない!
- コマンドプロンプトを起動して、って書いてあるけどどうやるの!?
- コマンドプロンプトを起動して、「python helloworld.py」と入力してもエラーメッセージが出るんだけど!
といったところでつまずいてしまったあなたに贈る、Pythonのプログラムの実行方法を説明する記事です。
いろいろなページでサラッと書いてあることは、そんな意味だったのか!と目からうろこが落ちる記事になっていますので、ゆっくりお読みください。
本記事を読む前に、Pythonがどんなプログラミング言語なのかをおさらいしておきたい人は次の記事を参考にしてください。
→ Pythonとは?特徴やできること、活用例をわかりやすく簡単に解説
なお、その他のPythonの記事についてはこちらにまとめています。
Pythonのプログラムを実行する際に直面する壁、誰もが一度は経験するものです。特に初心者にとっては、コマンドプロンプトの操作やエラーメッセージの対処は難しく感じられるかもしれません。しかし、こうした技術的な壁を乗り越えることで、新たなスキルを手に入れるチャンスが広がります。
プログラミングの基礎を固めた後は、次のステップとして生成AIとWeb制作のスキルを学び、実践的に収益を得る方法を身につけてみませんか?この分野では、机上の空論ではなく、実際に役立つノウハウを提供する環境が整っています。少しでも興味がある方は、セミナーの詳細を確認して、自分に合った学びの場を見つけてみませんか?
Pythonでせっかく書いたプログラムが実行できない!?
以下のようなhelloworld.pyを、「D:\Python\helloworld」フォルダに作成しましょう。
print("Hello World!")
次に、「python helloworld.py」と入力して実行しましょう。
Hello World!
と表示…されたらこの記事は読んでいませんよね。
この『「python helloworld.py」と入力して実行しましょう。』のたった1行で説明されている操作を、インストールした環境ごとに説明していきます。
Python環境別プログラムの実行方法
Python 3.6をインストールした場合
まずは、以下の記事を参考にPython 3.6をインストールした場合の、実行方法から説明しましょう。
ただし、インストールの途中で表示される「Add Python 3.6 to PATH」にチェックをつけましょう。これは、隠れたつまずきポイントです。
ここでは、Windows 10にインストールした場合の操作を説明します。
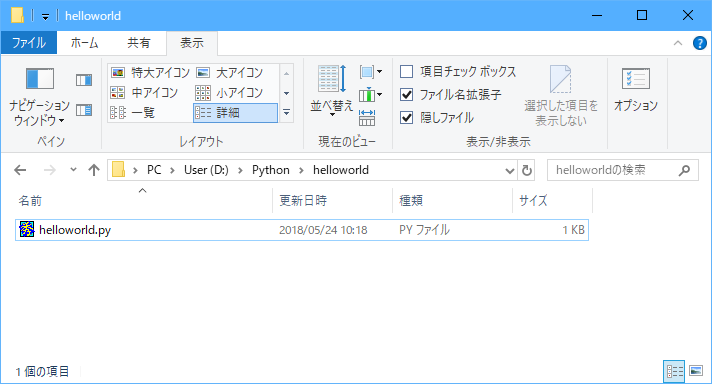
まずは、以下の内容のhelloworld.pyを、DドライブのPythonフォルダの中のhelloworldフォルダに作成しましょう。
print("Hello World!")
「helloworld.py」をエクスプローラーで確認すると以下のようになります。
では、このhelloworld.pyをPython 3.6で実行しましょう。
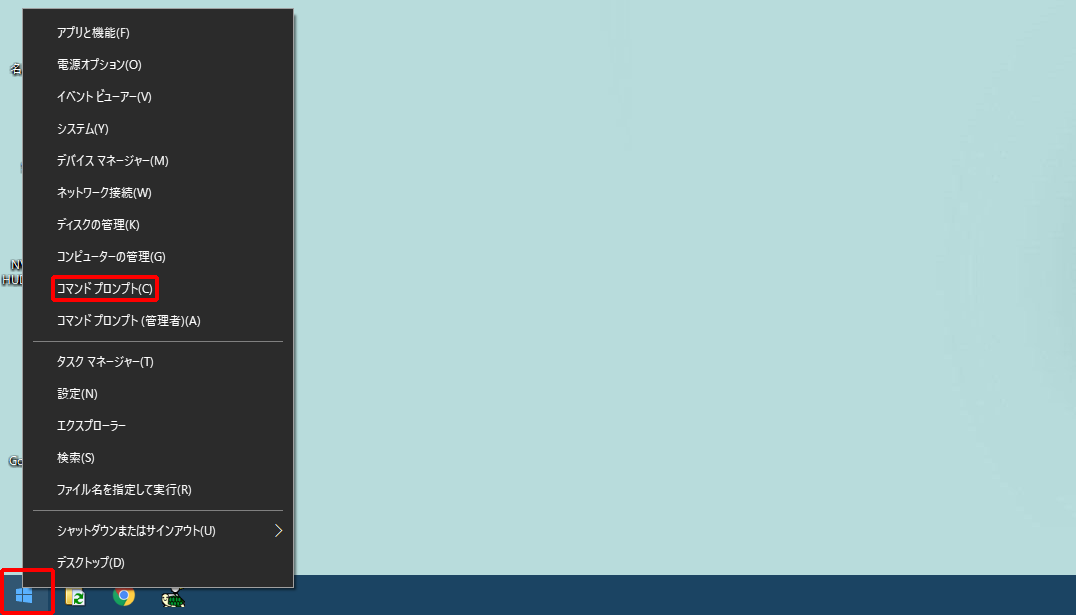
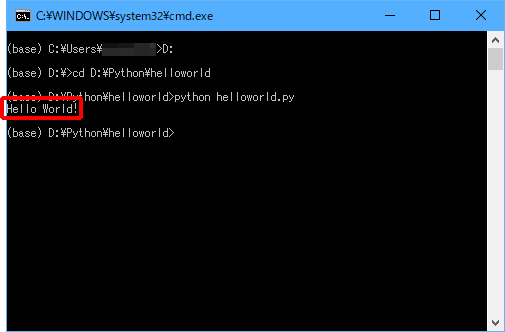
(1)スタートボタンを右クリックして、「コマンドプロンプト」をクリックします。
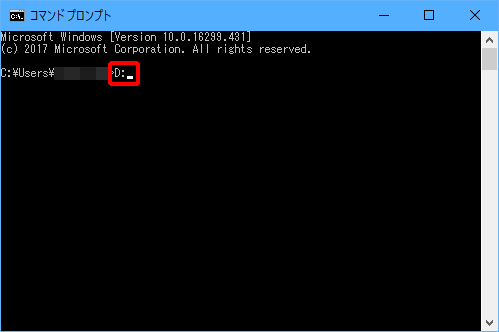
(2)「D:」と入力し、Enterキーを押します。
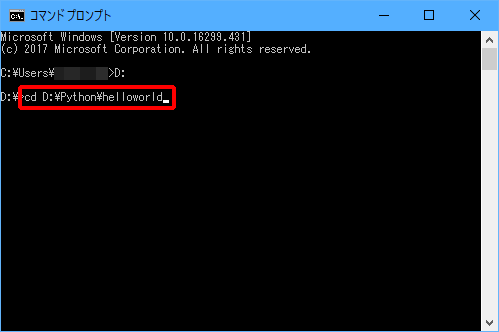
(3)「cd D:\Python\helloworld」と入力し、Enterキーを押します。
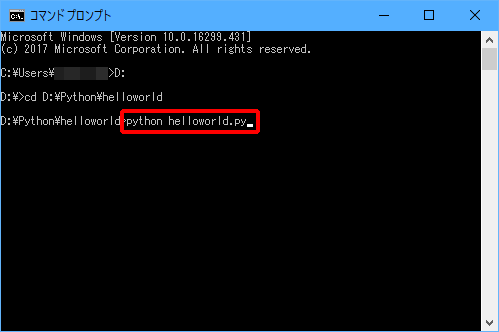
(4)「python helloworld.py」と入力し、Enterキーを押します。
「Hello World!」と表示されましたか?
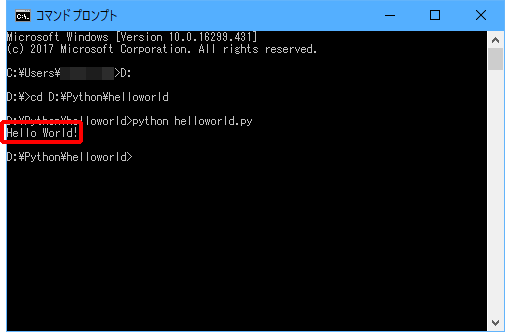
表示されていれば、これで作成したファイルが、Python 3.6で実行できたことになりますね!
もし、以下のようなメッセージが表示されたときは、次の点を確認します。
D:\Python\helloworld>python helloworld.py
python: can't open file 'helloworld.py': [Errno 2] No such file or directory
- D:\Python\helloworldフォルダにhelloworld.pyが保存されていますか。
- 「helloworld.py」を間違えて「heloworld.py」(lが1つしかない)などになっていませんか。
- 「python helloworld.py」と入力するときに、カーソルより左側に「D:\Python\helloworld>」と表示されていますか。
Anacondaをインストールした場合
次は、以下の記事を参考にAnacondaをインストールした場合の実行方法です。

Anacondaの場合も、以下の内容のhelloworld.pyを、DドライブのPythonフォルダの中のhelloworldフォルダに作成しましょう。
print("Hello World!")
「helloworld.py」をエクスプローラーで確認すると以下のようになります。
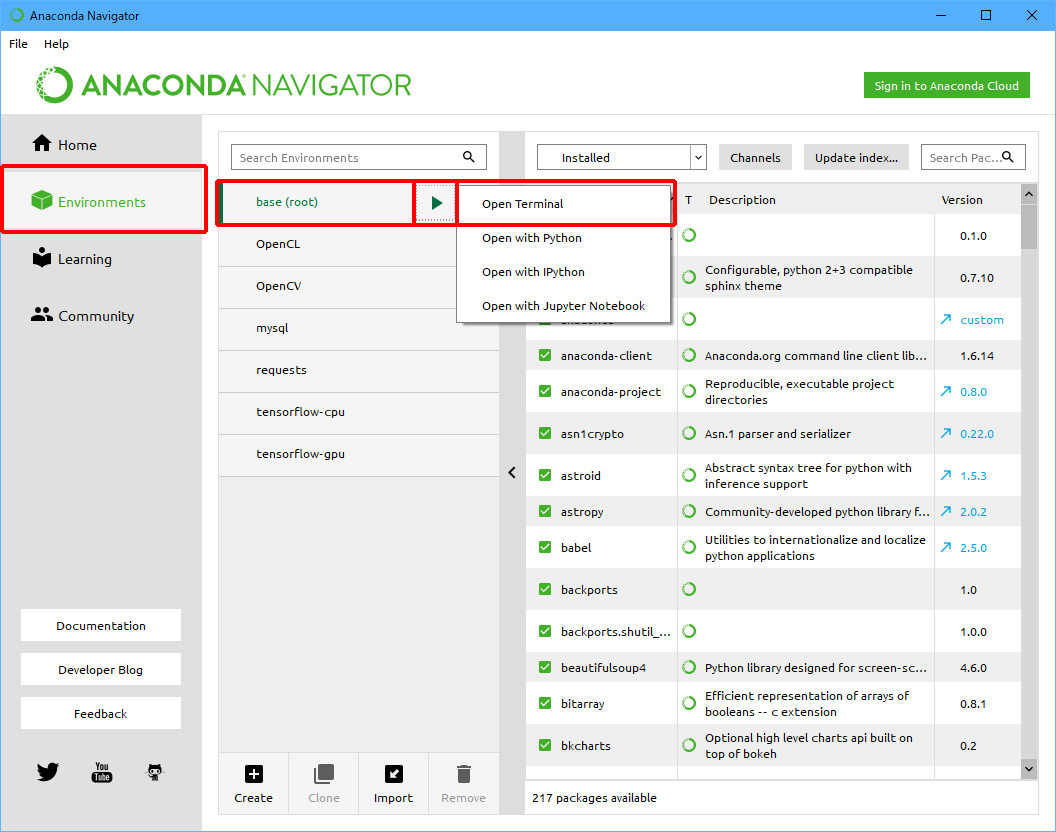
では、このhelloworld.pyをAnacondaのbase (root)環境で実行しましょう。
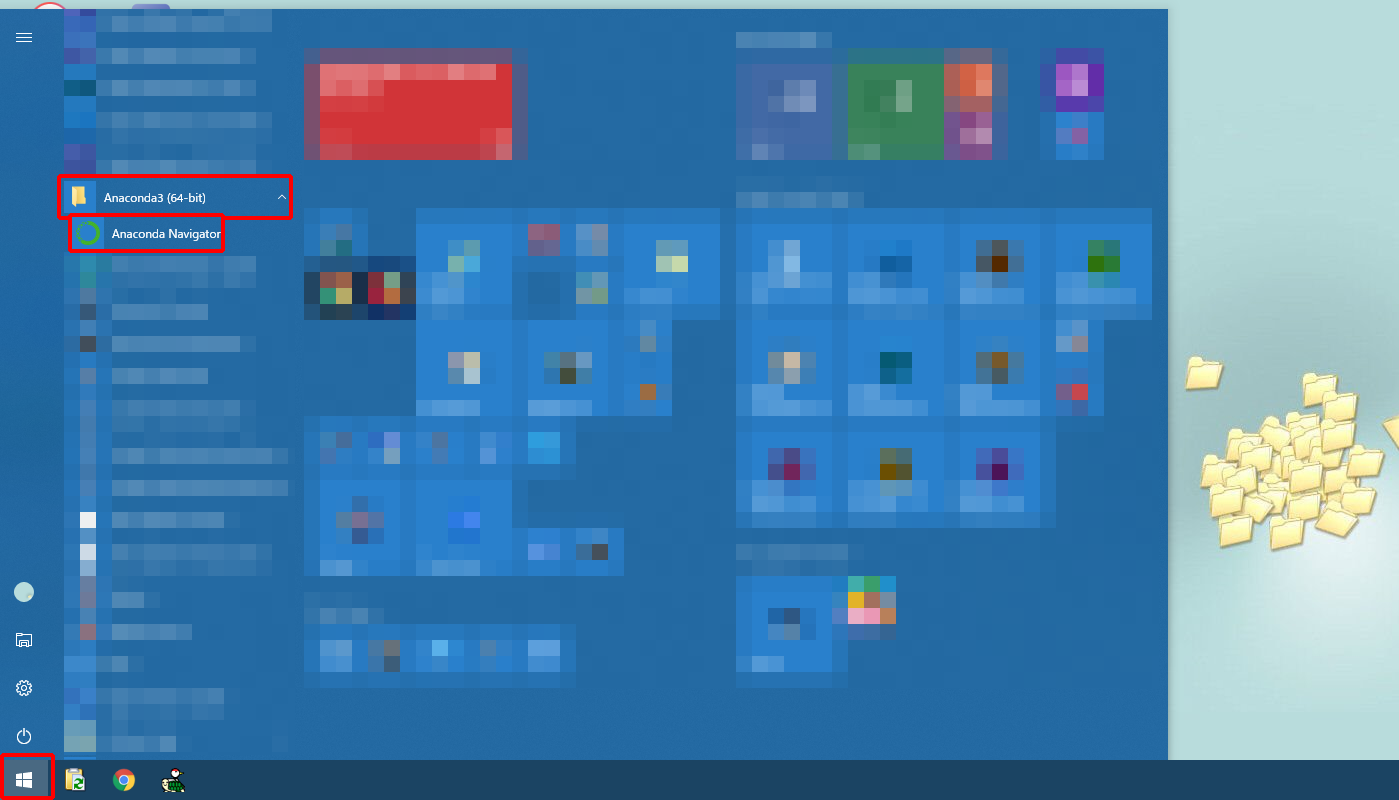
(1)スタートボタンをクリックして、「Anaconda3 (64-bit)」→「Anaconda Navigator」の順にクリックします。
(2)「Environments」をクリック後、「base (root)」をクリックし、「![]() 」をクリックして、「Open Terminal」をクリックします。
」をクリックして、「Open Terminal」をクリックします。
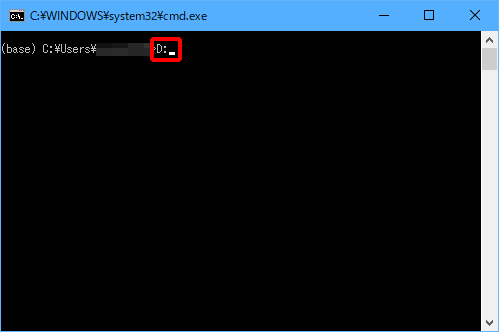
(3)「D:」と入力し、Enterキーを押します。
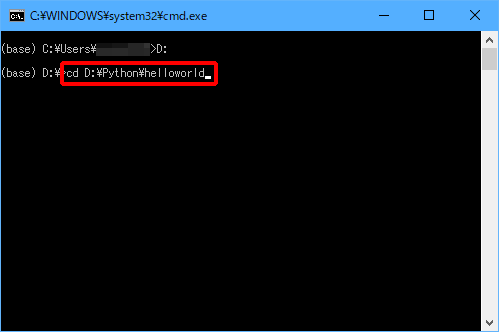
(4)「cd D:\Python\helloworld」と入力し、Enterキーを押します。
(5)「python helloworld.py」と入力し、Enterキーを押します。
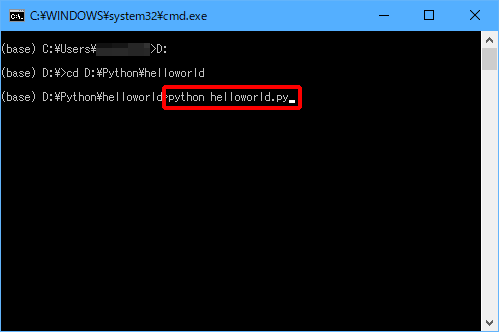
「Hello World!」と表示されましたか?
表示されていれば、これで作成したファイルが、Anacondaで実行できたことになりますね!
もし、以下のようなメッセージが表示されたときは、次の点を確認します。
(base) D:\Python\helloworld>python helloworld.py
python: can't open file 'helloworld.py': [Errno 2] No such file or directory
- D:\Python\helloworldフォルダにhelloworld.pyが保存されていますか。
- 「helloworld.py」を間違えて「heloworld.py」(lが1つしかない)などになっていませんか。
- 「python helloworld.py」と入力するときに、カーソルより左側に「(base) D:\Python\helloworld>」と表示されていますか。
PyCharmをインストールした場合
最後に、以下の記事でPyCharmをインストールした場合の実行方法を説明して終わりにしましょう。
PyCharmの場合は、先にプロジェクトを作成する必要があるので、ちょっと手間が増えますが辛抱強く行きましょう。
(1)スタートボタンをクリックし、「JetBrains」→「JetBrains PyCharm Community Edition 2018.1.3」の順にクリックします。

PyCharmが起動します。
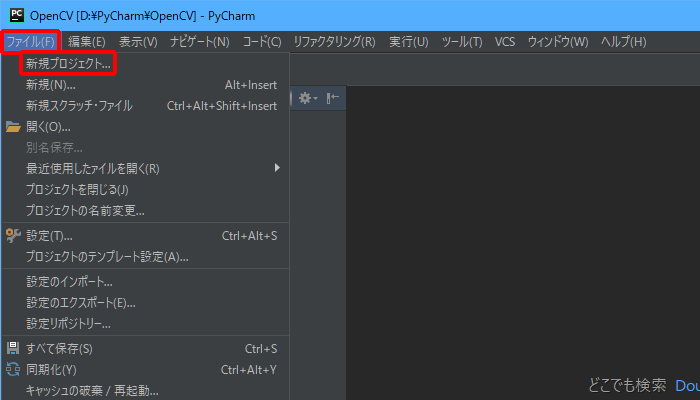
(2)「ファイル」→「新規プロジェクト」の順にクリックします。
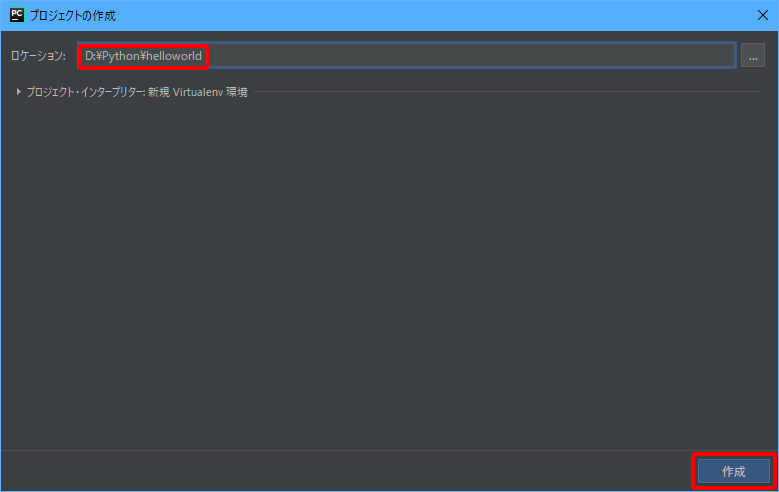
(3)「ロケーション」に「D:\Python\helloworld」と入力し、「作成」をクリックします。
※ここで以下の画面が表示された場合は、「いいえ」をクリックして、別のフォルダを指定してください。既存のフォルダを指定すると、Pythonの実行環境を作成できません。

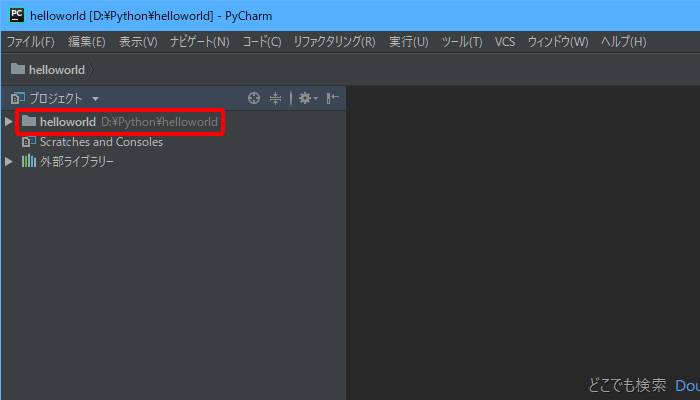
(5)「helloworld D:\Python\helloworld」をクリックします。
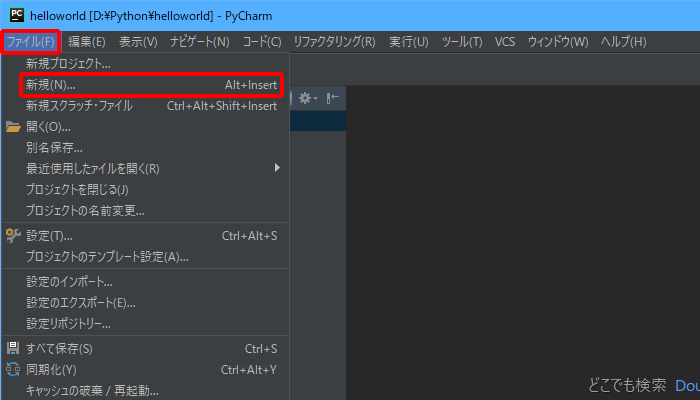
(6)「ファイル」→「新規」の順にクリックします。
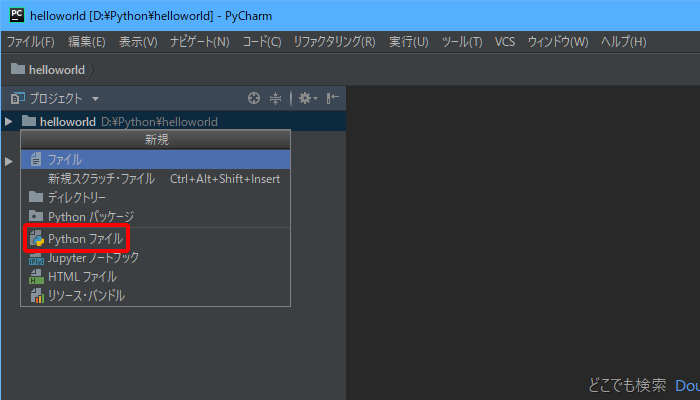
(7)「Pythonファイル」をクリックします。
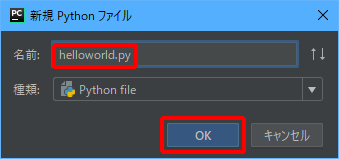
(8)「名前」に「helloworld.py」と入力し、「OK」をクリックします。
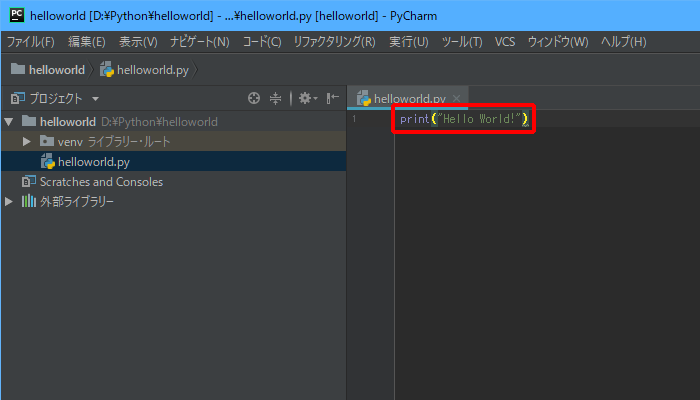
(9)「print(“Hello World!”)」と入力します。
(10)「実行」→「デバッグ」の順にクリックします。
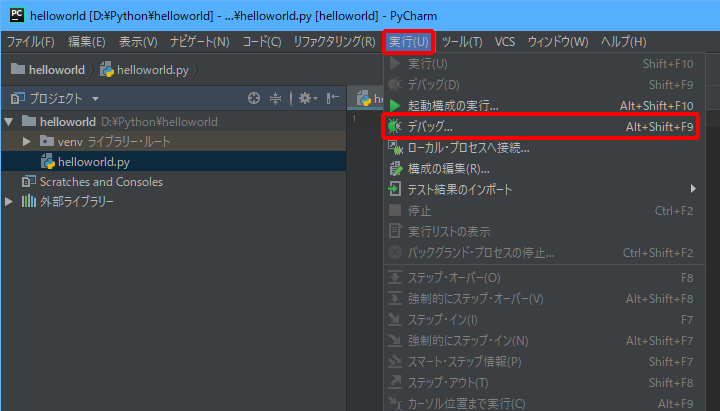
(11)「helloworld」をクリックします。

helloworld.pyが実行され、PyCharmの左下に「Hello World!」と表示されます。

これで、PyCharmで実行できたことになりますね!
まとめ
今回は、Pythonのインストールが終わった方に向けて、自分で書いたプログラム(helloworld.py)を実行する操作を説明しました。
『「python helloworld.py」と入力して実行しましょう。』のたった1行で説明されている操作が、実はこんなに大変だったのか!と目からうろこが落ちたのではないでしょうか。
ここまでくれば、あとは自分が好きなようにプログラムを書き、実行するだけです! その「実行するだけ」が大変ではありますが、何とかやっていけそう!という気がしてきたのではないでしょうか。
では!